LED blinker
Introduction
For my experiments with the Red Pitaya, I'd like to have the following development environment:
- recent version of the Vitis Core Development Kit
- recent version of the Linux kernel
- recent version of the Debian distribution on the development machine
- recent version of the Debian distribution on the the Red Pitaya board
- basic project with all the Red Pitaya peripherals connected
- mostly command-line tools
- shallow directory structure
Here is how I set it all up.
Pre-requirements
My development machine has the following installed:
Debian 13 (amd64)
Vitis Core Development Kit 2025.2
Here are the commands to install all the other required packages:
apt-get update

apt-get --no-install-recommends install \
  bc binfmt-support bison build-essential ca-certificates curl \
  debootstrap device-tree-compiler dosfstools flex fontconfig git \
  libgtk-3-0 libncurses-dev libssl-dev libtinfo6 parted qemu-user-static \
  squashfs-tools sudo u-boot-tools x11-utils xvfb zerofree zip
Source code
The source code is available at
https://github.com/pavel-demin/red-pitaya-notes
This repository contains the following components:
- Makefile that builds everything (almost)
- cfg directory with constraints and board definition files
- cores directory with IP cores written in Verilog
- projects directory with Vivado projects written in Tcl
- scripts directory with
- Tcl scripts for Vivado and SDK
- shell scripts that build a bootable SD card and SD card image
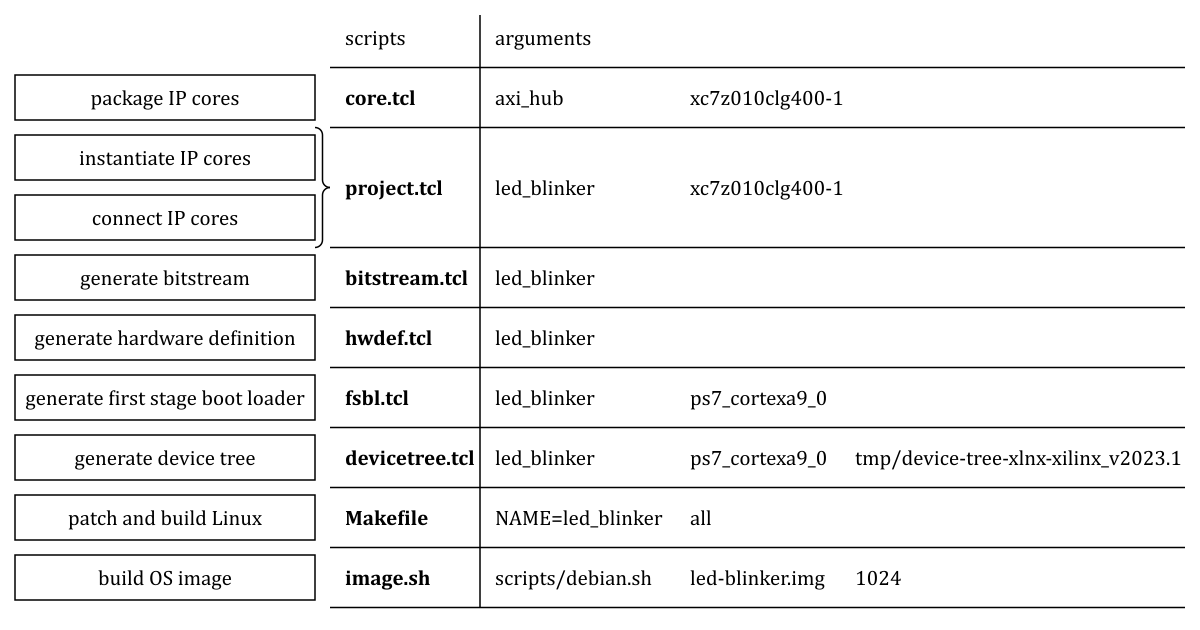
All steps of the development chain and the corresponding scripts are shown in the following diagram:
Syntactic sugar for IP cores
The projects/led_blinker directory contains one Tcl file block_design.tcl that instantiates, configures and interconnects all the needed IP cores.
By default, the IP core instantiation and configuration commands are quite verbose:
create_bd_cell -type ip -vlnv xilinx.com:ip:processing_system7:5.5 ps_0

set_property CONFIG.PCW_IMPORT_BOARD_PRESET cfg/red_pitaya.xml [get_bd_cells ps_0]

connect_bd_net [get_bd_pins ps_0/FCLK_CLK0] [get_bd_pins ps_0/M_AXI_GP0_ACLK]
With the Tcl's flexibility, it's easy to define a less verbose command that looks similar to the module instantiation in Verilog:
cell xilinx.com:ip:processing_system7:5.5 ps_0 {
  PCW_IMPORT_BOARD_PRESET cfg/red_pitaya.xml
} {
  M_AXI_GP0_ACLK ps_0/FCLK_CLK0
}
The cell command and other helper commands are defined in the scripts/project.tcl script.
Getting started
Setting up the Vitis and Vivado environment:
source /opt/Xilinx/2025.2/Vitis/settings64.shCloning the source code repository:
git clone https://github.com/pavel-demin/red-pitaya-notes
cd red-pitaya-notes
Building Vivado project:
make NAME=led_blinker xprOpening Vivado project:
vivado tmp/led_blinker.xprBuilding bitstream file:
make NAME=led_blinker bitSD card image
Building boot.bin:
make NAME=led_blinker allBuilding a bootable SD card image:
sudo sh scripts/image.sh scripts/debian.sh red-pitaya-debian-13-armhf.img 2048The SD card image size is 2 GB, so it should fit on any SD card starting from 4 GB.
To write the image to a SD card, the dd command-line utility can be used on GNU/Linux and Mac OS X or Win32 Disk Imager can be used on MS Windows.
The default password for the root account is changeme.
A pre-built SD card image can be downloaded from this link.
Resizing SD card partitions on running Red Pitaya:
# delete second partition
echo -e "d\n2\nw" | fdisk /dev/mmcblk0
# recreate partition
parted -s /dev/mmcblk0 mkpart primary ext4 16MiB 100%
# resize partition
resize2fs /dev/mmcblk0p2
Reprogramming FPGA
It's possible to reprogram the FPGA by loading the bitstream file into /dev/xdevcfg:
cat led_blinker.bit > /dev/xdevcfg