Pulsed NMR system
This is a work in progress...
Interesting links
Some interesting links on pulsed nuclear magnetic resonance:
The Basics of NMR by Joseph P. Hornak
Short description
The system consists of two in-phase/quadrature (I/Q) digital down-converters (DDC), a pulse generator and a gate controller.
The gate controller includes pulse generation and data acquisition sequencers. The pulse generation sequencer manages all aspects of the generated pulses, such as their duration, level and phase. The data acquisition sequencer allows the selection of the I/Q samples required for data analysis.
The tunable frequency range covers from 0 Hz to 60 MHz.
The I/Q data rate is configurable from 20 to 1250 kSPS.
Hardware
The basic blocks of the system are shown in the following diagram:
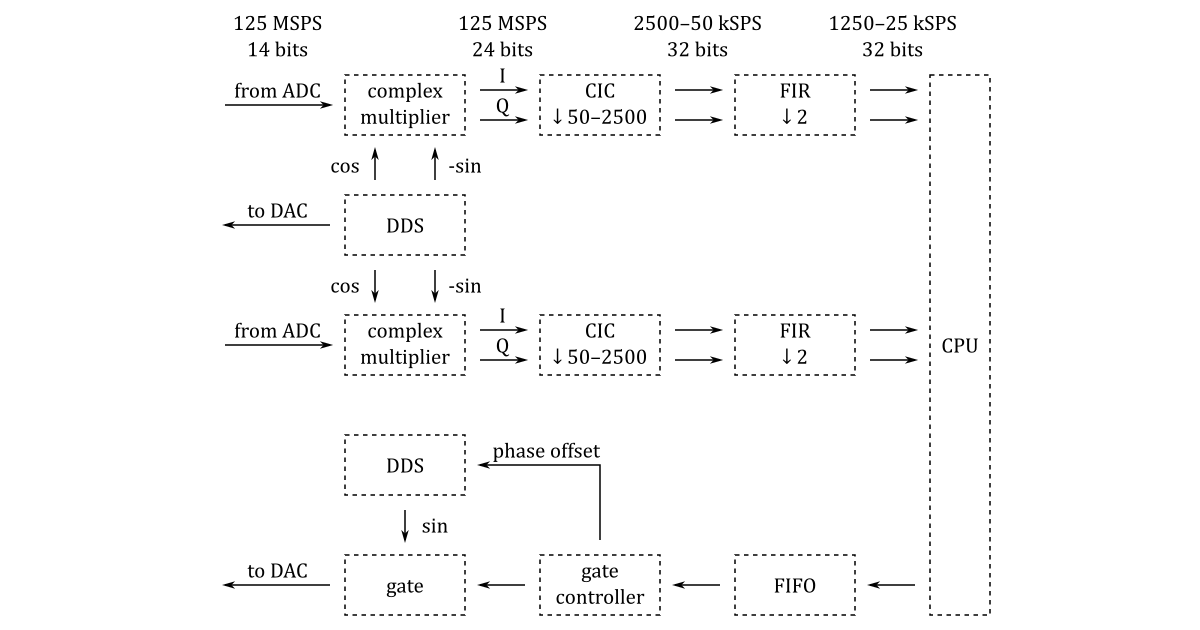
The projects/pulsed_nmr directory contains three Tcl files: block_design.tcl, rx.tcl, tx.tcl. The code in these files instantiates, configures and interconnects all the needed IP cores.
The source code of the R script used to calculate the coefficients of the FIR filter can be found in projects/pulsed_nmr/filters/fir_0.r.
RF and GPIO connections
- two digital down-converters (DDC) are connected to IN1 and IN2
- pulse generator is connected to OUT1
- continuous cosine signal of the receiver's DDS is connected to OUT2
- non-inverted (active-high) gating/blanking output is connected to pin DIO0_N of the extension connector E1
- inverted (active-low) gating/blanking output is connected to pin DIO1_N of the extension connector E1
- general purpose digital outputs are connected to the pins DIO1_P - DIO7_P of the extension connector E1
Application programming interface
The pulsed-nmr-notebooks repository contains libraries for Python, Julia and C#, as well as example Jupyter notebooks using these libraries to control all parameters of the signal processing modules and programming the pulse generator.
The commands implemented in these libraries can be classified into five groups.
Commands to manage the connection with the TCP server:
- Connect(host)
- Disconnect()
Commands to set frequencies, ADC sample rate and CIC decimation rate:
- SetFreqs(tx, rx)
- SetRates(adc, cic)
Commands to program a pulse sequence:
- ClearEvents()
- AddEvent(delay, sync, gate, read, level, txPhase, rxPhase)
Command to start pulse sequence and receive data:
- ReadData()
Commands to control external DAC, OUT2 signal level and GPIO pins:
- SetDAC(level)
- SetLevel(level)
- SetPin(pin)
- ClearPin(pin)
Software
The projects/pulsed_nmr/server directory contains the source code of the TCP server (pulsed-nmr.c) that receives control commands and transmits the I/Q data streams (up to 4 x 32 bit x 1250 kSPS = 152 Mbit/s) to the control program running on a remote PC.
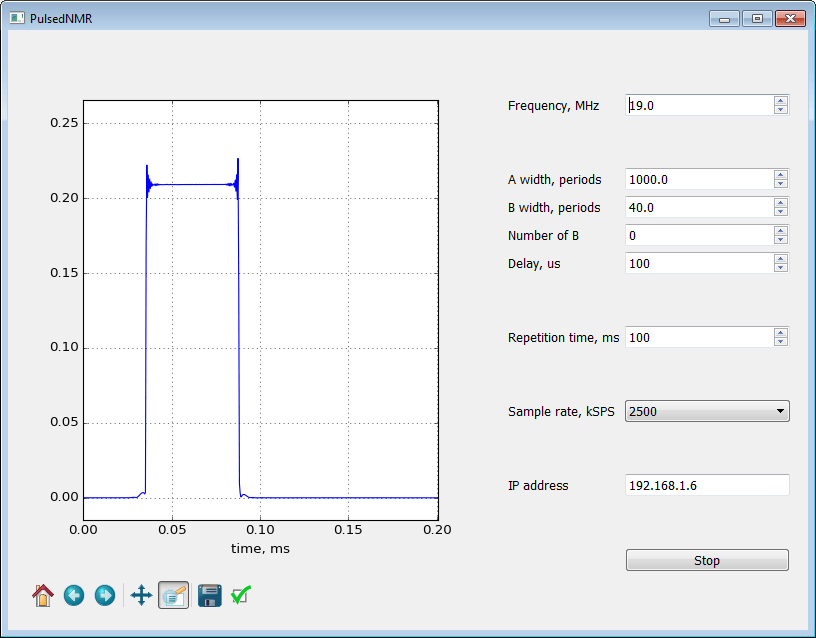
The projects/pulsed_nmr/client directory contains the source code of the control program (pulsed_nmr.py).
Getting started with GNU/Linux
- Download SD card image zip file (more details about the SD card image can be found at this link).
- Copy the contents of the SD card image zip file to a micro SD card.
- Optionally, to start the application automatically at boot time, copy its
start.shfile fromapps/pulsed_nmrto the topmost directory on the SD card. - Install the micro SD card in the Red Pitaya board and connect the power.
- Install required Python libraries:
sudo apt-get install python3-numpy python3-matplotlib python3-pyqt6- Clone the source code repository:
git clone https://github.com/pavel-demin/red-pitaya-notes- Run the control program:
cd red-pitaya-notes/projects/pulsed_nmr/client
python3 pulsed_nmr.py
Building from source
The installation of the development machine is described at this link.
The structure of the source code and of the development chain is described at this link.
Setting up the Vitis and Vivado environment:
source /opt/Xilinx/2025.2/Vitis/settings64.shCloning the source code repository:
git clone https://github.com/pavel-demin/red-pitaya-notes
cd red-pitaya-notes
Building pulsed_nmr.bit:
make NAME=pulsed_nmr bitBuilding SD card image zip file:
source helpers/build-all.sh