SDR transceiver
Introduction
This is a port of the SDR transceiver application for the Red Pitaya board to the Eclypse Z7 board.
The SDR transceiver application for the Red Pitaya board is described at this link.
All programs and libraries that work with the SDR transceiver application for the Red Pitaya board should also work with this port.
This application requires Zmod Digitizer and Zmod AWG to be connected to the Eclypse Z7 board as follows:
- Zmod Digitizer is connected to ZMOD A connector
- Zmod AWG is connected to ZMOD B connector
Hardware
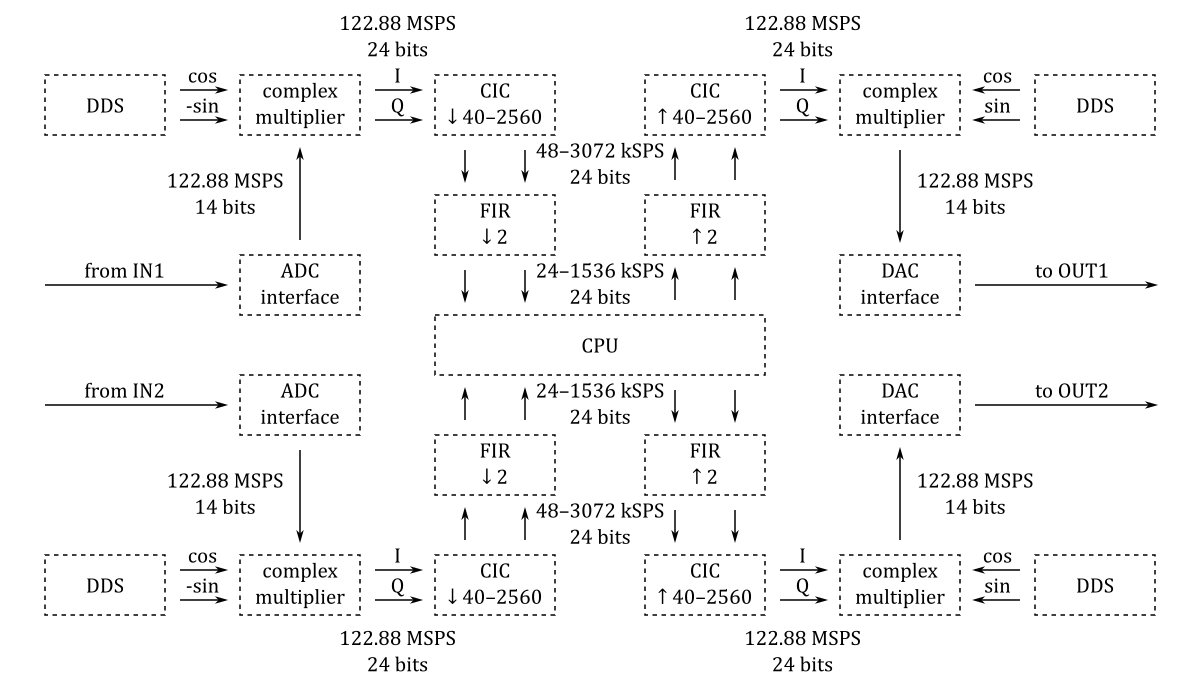
The SDR transceiver consists of two SDR receivers and of two SDR transmitters.
The implementation of the SDR receivers is quite straightforward:
- An antenna is connected to one of the inputs of the Zmod Digitizer module.
- The on-board ADC (122.88 MS/s sampling frequency, 14-bit resolution) digitizes the RF signal from the antenna.
- The data coming from the ADC is processed by a in-phase/quadrature (I/Q) digital down-converter (DDC) running on the FPGA.
The SDR transmitters consist of the similar blocks but arranged in an opposite order:
- The I/Q data is processed by a digital up-converter (DUC) running on the FPGA.
- The on-board DAC (122.88 MS/s sampling frequency, 14-bit resolution) outputs RF signal.
- An antenna is connected to one of the outputs of the Zmod AWG module.
The tunable frequency range covers from 0 Hz to 122.88 MHz.
The I/Q data rate is configurable and five settings are available: 24, 48, 96, 192, 384, 768 and 1536 kSPS.
The basic blocks of the digital down-converters (DDC) and of the digital up-converters (DUC) are shown in the following diagram:

The projects/sdr_transceiver directory contains four Tcl files: block_design.tcl, trx.tcl, rx.tcl, tx.tcl. The code in these files instantiates, configures and interconnects all the needed IP cores.
Software
The projects/sdr_transceiver/server directory contains the source code of the TCP server (sdr-transceiver.c) that receives control commands and transmits/receives the I/Q data streams (up to 2 x 32 bit x 1536 kSPS = 91.6 Mbit/s) to/from the SDR programs.
The projects/sdr_transceiver/gnuradio directory contains an example of a flow graph configuration for GNU Radio Companion.
Getting started with GNU Radio
- Connect an antenna to the CH1 connector of the Zmod Digitizer module.
- Download SD card image zip file (more details about the SD card image can be found at this link).
- Copy the contents of the SD card image zip file to a micro SD card.
- Optionally, to start the application automatically at boot time, copy its
start.shfile fromapps/sdr_transceiverto the topmost directory on the SD card. - Install the micro SD card in the Eclypse Z7 board and connect the power.
- Install GNU Radio:
sudo apt-get install gnuradio- Clone the source code repository:
git clone https://github.com/pavel-demin/eclypse-z7-notes- Run GNU Radio Companion and open FM receiver flow graph:
cd eclypse-z7-notes/projects/sdr_transceiver/gnuradio
export GRC_BLOCKS_PATH=.
gnuradio-companion fm.grc
Getting started with SDR# and HDSDR
- Connect an antenna to the CH1 connector of the Zmod Digitizer module.
- Download SD card image zip file (more details about the SD card image can be found at this link).
- Copy the contents of the SD card image zip file to a micro SD card.
- Optionally, to start the application automatically at boot time, copy its
start.shfile fromapps/sdr_transceiverto the topmost directory on the SD card. - Install the micro SD card in the Eclypse Z7 board and connect the power.
- Download and install SDR# or HDSDR.
- Download pre-built ExtIO plug-in for SDR# and HDSDR.
- Copy
extio_red_pitaya.dllinto the SDR# or HDSDR installation directory. - Start SDR# or HDSDR.
- Select Red Pitaya from the Source list in SDR# or from the Options [F7] → Select Input menu in HDSDR.
- Press Configure icon in SDR# or press SDR-Device [F8] button in HDSDR, then enter the IP address of the Eclypse Z7 board and set ADC sample rate to 122.88 MSPS.
- Press Play icon in SDR# or press Start [F2] button in HDSDR.
Building from source
The structure of the source code and of the development chain is described at this link.
Setting up the Vitis and Vivado environment:
source /opt/Xilinx/Vitis/2023.1/settings64.shCloning the source code repository:
git clone https://github.com/pavel-demin/eclypse-z7-notes
cd eclypse-z7-notes
Building sdr_transceiver.bit:
make NAME=sdr_transceiver bitBuilding SD card image zip file:
source helpers/build-all.sh